Viz World Classic User Guide
Version 23.0 | Published December 12, 2023 ©
Introduction to Shapes
Each shape consists of a number of points joined by straight lines or smooth curves. A range of shape tools is provided to enable you to draw shapes point by point, by drawing a freehand curve, or by drawing a precise rectangle or ellipse.
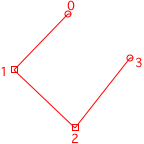
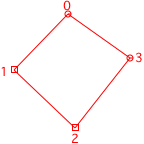
Each shape has a start point and an end point, displayed as circles; the intermediate points are displayed as squares. In a closed shape, the start and end points are joined:


You can control the appearance of shapes by changing the border and fill colors, border thickness, opacity, and blur. Shapes can be edited or transformed after you have created them, and a series of tools are provided to allow you to move, edit, divide, or join shapes. You can also use a shape to cut a hole in the currently selected layer.
You can animate the entire drawing on the shape layer, the individual shapes in the drawing, and the individual points of each shape. So for example, a shape could be used to show the path of a hurricane, with the shape changing in size as it moves across the land.
Shape Layers
You can create shapes in one or more shape layers. Each shape layer can be animated as a single unit, pinned to a map layer, wrapped to the map, and scaled to the map. Typically you would create a new shape layer for each drawing consisting of several shapes. This makes it easy to transform the complete drawing as a unit, such as animating its position or fading it in by changing the opacity. Shapes can also be used to create holes in other shapes.
Shape Overlays in Map Layers
You can also add shape overlays to a map layer. Shape overlays are always wrapped to the map, and can be displayed in the same style as other map details. Shape overlays in map layers can be constructed by automatically tracing an existing map detail.