Datacenter User Guide
Version 2.1 | Published April 03, 2024 ©
Manipulating Dataset Entries via Scripting
Introduction
Scripting can be used to process the incoming data before it is sent to the output, allowing flexible data manipulation. For example, data can be normalized to an expected format / units, and new entries can be computed from incoming data.
These are the following topics:
Applying a Script
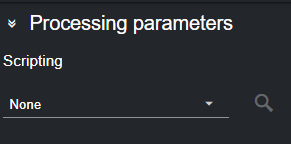
Scripts can be applied to a dataset via the Processing parameters panel:

-
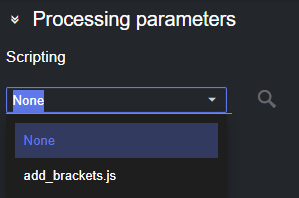
To apply a script, open the corresponding dropdown menu and select the script to apply.

-
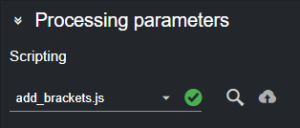
Scripts are applied immediately on the dataset output. When applied successfully, the icon next to the script name turns green.

-
Conversely, scripts that are not applied successfully show a red icon next their name. You can hover over the icon to reveal the error message.

-
By clicking the magnifier glass icon
 you can inspect the content of the loaded script.

-
In case of errors, information about the error(s) type and location is displayed below the code section.

-
Adding a New Script
Datacenter, constantly monitors all the scripts located in C:\ProgramData\vizrt\Datacenter\scripts, and therefore, the new scripts added to that folder are immediately visible in the Datacenter script list.
Another option to add a new script is to enable the Allow uploading scripts toggle in the General/Communication section of the Admin page.

Doing so, enables an upload button next to the scripts list in the main page, which can be use to load new scripts.

Warning: Datacenter does not vet uploaded scripts, therefore, allowing the upload of arbitrary scripts to Datacenter can pose a security threat. We strongly recommend to enable scripts uploading, only when strictly necessary and for the time required.
Development
Scripts are Javascript programs located in C:\ProgramData\vizrt\Datacenter\scripts, and they must be named as *.js (sub-directories are supported).
Scripts are constantly monitored by Datacenter, and are reloaded every time there is a change.
To start developing a script, simply open a Visual Studio Code (or any other text editor) in C:\ProgramData\vizrt\Datacenter\scripts, create a script and see your changes applied as soon as the file is saved.
Warning: Because of the file watcher, when saving a script with VS Code, the file might suddenly become empty. Therefore, simply Undo (CTRL + Z) the last action and save the file again.
Process
All scripts must export a function named process, which is then called whenever data is received from a provider.
When multiple inputs are configured (for example multiple endpoints for a REST provider), the input variable holds the incoming data in multiple members named data, data_1, data_2.
Example
Here is an example of a script with the following inputs:
raw_endpoint_data_1 = { // in the script, this is readable from input.data "key11": 1, "key12": 2}raw_endpoint_data_2 = { // in the script, this is readable from input.data_1 "key21": 3, "key22": 4}export function process(input) { var obj1 = JSON.parse(input.data); var obj2 = JSON.parse(input.data_1); return { a: obj1.key11, b: obj2.key21, c: obj1.key12 + obj2.key22 }}The output data is then three keys (a, 1), (b, 3) and (c, 6).
Arguments
To allow more flexible scripts, arguments can be added to the code and are shown in the UI.
It is possible to add numbers, strings, enums and date arguments that are then passed to the script during execution.
A function named getProcessArguments must be exported from the script and must return the arguments created with helper functions (see example). This function takes an optional parameter of the current provider input, allowing to create arguments dependent on the currently received values.
Argument Declaration Helper Functions
The following helpers can be used to declare scripts arguments:
function argumentEnum(name, defaultIndex, values, description="") { /*... */ }function argumentString(name, defaultValue, description="") { /*... */ }function argumentInt(name, defaultValue, min = Number.MIN_VALUE, max = Number.MAX_VALUE, description="") { /*... */ }function argumentFloat(name, defaultValue, min = Number.MIN_VALUE, max = Number.MAX_VALUE, description="") { /*... */ }function argumentDate(name, defaultValue, description="") { /*... */ }The enum values can be of type string, or an object of type {label: string, data: string}. On the second case, the label is displayed to the user and the script receives the data.
Example
export function getProcessArguments() { return [ argumentEnum("enumArg", 0, ["option1", "option2"], "An enum argument"), argumentEnum("enumWithValuesArg", 1, [ {"label": "option3", "data": "value3"}, {"label": "option4", "data": "value4"}], "Another enum argument"), argumentString("stringArg", "default value", "A string argument"), argumentInt("intArg", 2, 0, 5, "An int argument"), argumentFloat("floatArg", 3.1, 1.2, 5.6, "A float argument"), argumentDate("dateArg", "2023-07-01", "A date argument"), ];}export function process(input, args) { var result = {} result["receivedInput"] = input.data; result["receivedEnumArg"] = args.enumArg; result["receivedEnumWithValuesArg"] = args.enumWithValuesArg; result["receivedStringArg"] = args.stringArg; result["receivedIntArg"] = args.intArg; result["receivedFloatArg"] = args.floatArg; result["receivedDateArg"] = args.dateArg; return result; }/** Function called by the Viz Datacenter scripting stage. The script's input arguments are defined with this function. * @param {object} input The input object * @returns {object[]} An Array of arguments */export function getProcessArguments (input) { const events = getEvents(input) const options = getEventOptions(events) return [argumentEnum('Event', 0, options, 'The event to select')]}/** Retrieves the list of events from the input object * @param {object} input The input object * @returns {object[]} A list of all the events */function getEvents (input) { let events = [] if (input.data) { const obj = parseInputObject(input) for (const event of obj.liveData.event) { events.push(event) } } return events}Assuming some kind of input and if the user does not modify the default arguments, the dataset would contain the following values:
receivedInput { "inputData": "something" } receivedEnumArg option1 receivedEnumWithValuesArg value4 receivedStringArg default value receivedIntArg 2 receivedFloatArg 3.1 receivedDateArg 2023-07-01Imports
In order to allow code reuse, it is possible for a script to import another file. Those imported files must be named *.import.js, so they are not shown as scripts in the Datacenter UI.
The imports are relative to the scripts root directory C:\ProgramData\vizrt\Datacenter\scripts, not the current script directory.
Example
export function doNothing(input) { return input;}import { doNothing } from "utils/helpers.import.js"export function process(input) { return doNothing(input);}Caching Data
The Scripting module allows to cache data across executions. This is particularly useful when handling time-series, or when statistics across several executions need to be computed. Similarly, the value from one time slice can be saved and fetched at later stages. The cache can be directly accessed from within scripts and it is allocated per-script (two scripts cannot access the same cache values).
As the cache is implemented as an unordered map, you can update a value by writing in the same key on each run, or can store the value of an item in different runs by using a time-increasing key.
The following utility functions can be used to manipulate the cache:
Cache.Read()
-
read the current cache. Return a dictionary Dictionary<string, object>.
-
Cache.Remove(key: string)
-
removes the entry with key 'key' from the cache.
-
Cache.Write(newCache: Dictionary<string, object>)
-
swaps the current cache with 'newCache'.
-
Cache.Keys()
-
get all cache keys, as an Array<string>
-
Example
function getCachedData(key: string){ const cachedData = Cache.Read(key); return cachedData !== null ? cachedData : undefined;}function writeCachedData(key: string, value: string){ let cache = Cache.Read(); cache [key] = value; Cache.Write(cache);}function cleanCache(){ var cacheKeys = Cache.Keys(); for(let i=0; i<cacheKeys.length; ++i) { let key = cacheKeys[i]; Cache.Remove(cacheKeys[i]); }}export function manipulateCache() { const key = "my_key"; const data = 10; writeCachedData(key, data); const cached_data = getCachedData(key); console.log(cached_data); // 10 cleanCache(); const cached_data2 = getCachedData(key); console.log(cached_data2); // undefined }Debugging
To debug a script add the following launch configuration to VS Code:
{ "launch": { "configurations": [ { "name": "ClearScript", "type": "node", "request": "attach", "address": "localhost", "port": 9757 } ], "compounds": [] }}Then add the following line to the script to debug:
//SCRIPT_DEBUG_PORT=9757In VS code, execute Run and debug with the ClearScript configuration. The debugger attaches to the running script and breakpoints can be set in the Loaded scripts section.
Info: Because of some internal limitations, the debug port is not immediately freed after modifying a script. Therefore, it is necessary to adapt the debug port in the script and launch configuration when modifying and saving the debugged script.