
Viz Pilot User Guide
Version 8.3 | Published November 30, 2018 ©
Viz Pilot News
The user interface of Viz Pilot News allows you to fill templates with text, still image(s), video clip(s) and audio, or simply add them directly to the newsroom system for full screen graphics display, still image or video clip.
This section contains the following topics:
-
Template Search
-
Template Editor
-
Working with the Template Editor
-
Media Search
Template Search
The Template Search tab allows users to search for and open templates, and save them as unique data elements.
This section contains the following topics:
-
Template and Data Element Panes
-
Functions
-
Context Menus
-
Search bar
-
Newsroom workflow without database connection
Template and Data Element Panes
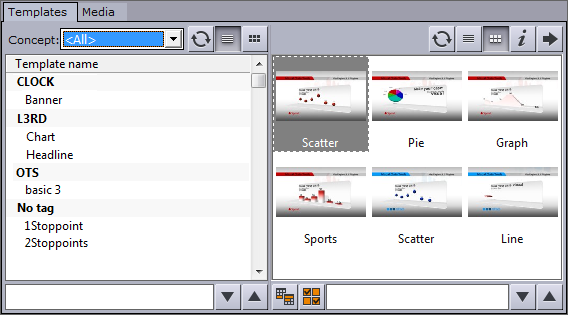
The Template pane (left) shows all templates based on the selection made in the concepts drop-list.
To open a template, double-click or press CTRL+SHIFT+O to open a template by name or CTRL+SHIFT+I to open a template by ID.
Note: If template tags have been defined, then templates are grouped by tag name in the list view. Tags are defined on the Tag Settings page of the Pilot Data Server Web Interface. Templates can be tagged in Template Wizard.
The Data Element pane (right) shows all data elements based on the selected concept. Click a template to show data elements based on the selected template. Data elements that have been saved as library elements are suffixed with an asterix (*), (see Saving an Element).
Note: Media files that are added to a template are searched for through Object Store and not by using the Media tab.
Functions
|
Function |
Description |
|
|
The Concepts dropdown shows all template concepts available on the database. Select a concept to see icons for that concept. |
|
|
The Refresh buttons, for the template pane and data element pane, refresh the window, and reload all templates/data elements available on the database. Keyboard shortcut: CTRL+SHIFT+R |
|
|
The Switch View buttons switch the template pane and data element pane between list and icon view. When viewed as a list, templates are sorted by Tag name. When viewing all templates (Concept: <All>) generic icons are used. |
|
|
Clicking the Information button displays typical version information, the connection parameters used by Viz Pilot News to connect to the Viz Pilot database, and a link to the list of Third Party Component Credits. |
|
|
The Arrow buttons switch between the template editor view, and the template and data element lists. Keyboard shortcut: CTRL+SHIFT+L |
|
|
When the Finish button is clicked, you can select whether or not the data elements view will hide data elements that are marked as finished. Keyboard shortcut: CTRL+SHIFT+N |
|
|
Use the Calendar button to filter results based on date range. Select from Last 24 hours, Last week, Last month, Custom date range: Keyboard shortcut: CTRL+SHIFT+D |
Context Menus
Context menu for templates pane:
-
Refresh: Retrieves new and updated data elements from the database.
-
Copy: Not available for the template view.
-
Show icon/list view: Toggle between icon and list view.
-
Font: Sets the font’s type and size.
Note: Style and script options will not be saved.
Context menu for data elements pane:
-
Refresh: Retrieves new and updated data elements from the database.
-
Sorting: Sets the sorting for the data element view. Options are; Sort by data element name (CTRL+N) and Sort by creation date (CTRL+D).
-
Show only library elements: Displays only data elements that are saved as library items. For details, see Saving an Element.
-
Copy: Copies the data element’s XML source such that it can be pasted into a newsroom story item or text editor.
-
Delete: Deletes the selected data elements.
-
Show icon/list view: Toggle between icon and list view.
-
Font: Sets the font’s type and size.
Note: Style and script options will not be saved.
Search bar

Below the template and data element panes are the search fields. Typing into them will search the respective pane for matching templates or data elements.
When searching for templates, Viz Pilot News will automatically display all data elements related to a template. When searching the data elements, it will select the first element matching the search criteria.
Newsroom workflow without database connection
The video workflow using Viz Pilot News will still work if the connection to the Viz Pilot database is unavailable.
If the Viz Pilot database is unavailable, it is possible to:
-
authenticate with a previously authenticated host (eg. Viz One),
-
search for videos,
-
add the video to a newsroom story,
-
preview the video in timeline editor,
-
open existing timeline items and make changes (no preview is available).
If the Viz Pilot database is unavailable, it is not possible to:
-
add graphics to video elements using the timeline editor.
To attempt to reconnect to the database, close and open Viz Pilot News, and then click the Reconnect button in the Templates tab.

Template Editor
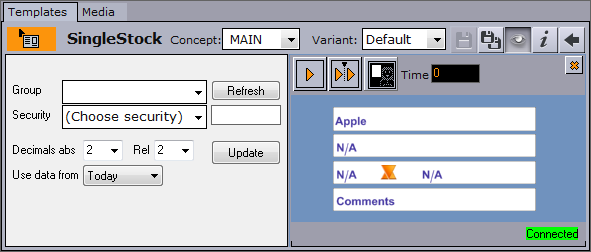
The Template Editor allows data elements to be created from templates, and previewed. The editor is made up of a Control Bar, Template Pane, and Preview Pane. You can set additional properties when Saving an Element. Many of the functions can be performed using the Keyboard Shortcuts for Template Editor.
The image below shows a saved data element with remote preview enabled.
Control Bar
The control bar shows the status and the name of the template, as well as the available concepts and variants, save options, preview, information and back buttons.
When the status of a saved data element is orange (as above), it indicates that the element has been saved to the database and is ready to be added to a running order/rundown in the newsroom system. Usually a drag & drop operation will add the data element to the news story; however, this may be different depending on the newsroom system.
There are two save buttons; Save and Save As  . The Save As button will show the save dialog and let you create a new data element using the data entered into the currently open template or data element.
Use the Save button to save changes to the existing data element that is currently open. In case this is a library element, the save dialog will appear, to help you avoid accidentally changing it. To overwrite it select the Add to library checkbox and click Overwrite.
The back button  takes you back to the template and data element lists.
Template Pane
The fields and layout that you see in the template pane are designed by template designers, using Template Wizard. It can therefore look many different ways, with or without elements such as images, buttons, text boxes, map selectors, etc. It is recommended to create an internal reference document for your workplace which describes the templates available for everyone, and how a user should work with them.
Preview Pane
Enable or hide the preview using the Preview button  .
.
When performing preview using a remote Viz Engine, the preview window can be detached, giving more space for the template. The local preview window is always detached.
The context menu of the preview pane includes the settings for detaching the preview pane, as well as size and optimization settings, and safety boundaries. For details, see Viz Engine Preview in the Newsroom.
Saving an Element
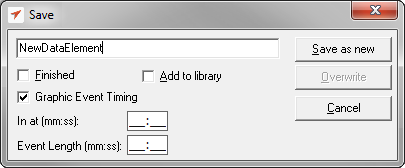
Viz Pilot News has its own save dialog for setting additional properties.
If the Template Spell Checker has been enabled, the save operation will open the spell checker prior to the save dialog. Spell checking is enabled by the template designer using Template Wizard.
-
Finished: If the data element is made in different revisions and you want to indicate that this is the final one, select the Finished check box. This information will be stored in the database and can be shown in the Finished column in the playlist (1 for finished and 0 for not finished). This setting has no impact on the element, other than displaying the value in the Finished column.
-
Add to library: Select this checkbox if the data element will be used often and you want to prevent it from being deleted. The data element will be saved as a library element, and all concept and variant information is kept. This prevents the data element from being deleted in Director when using Options > Delete Data Items. Library elements can still be deleted manually, and if the original template is deleted in Template Wizard, all data elements based on the template will also be deleted, including library elements.
The Add to library checkbox will by default be unchecked. To Overwrite an already existing library element, select the Add to library checkbox, click Overwrite and click Yes in the confirmation dialog.
Note: Data elements that are saved as library elements, will appear with an asterix (*) after their name in the data element list (see Template and Data Element Panes).
-
Graphic Event Timing: Select this to enable event timing.
Note: In order for the flag to be visible, it must be turned on in the Database Parameters (ax_dataelement_timer_enabled) or in Template Wizard (Template Information Component > Advanced Properties).
When checked, the following additional settings are available:
-
In at: Sets a start time (mm:ss), MOS-itemEdStart. Timing is relative to the story/group the element is a part of, rather than the complete playlist. The value appears in the Timecode column of the (MOS) playlist when opened in Director.
-
Event length: Sets the duration (MOS-itemEdDur) which tells the newsroom system how long the graphics will be on air. The value appears in the Duration column of the (MOS) playlist when opened in Director.
When an element from a MOS rundown is opened in Viz Pilot News, the timing fields in the save dialog will be populated with the timing information from the MOS XML. If the element is saved back to the rundown, the timing information will still be present in the XML.Note: In order for Viz Pilot News to generate the timing information in the MOS XML, the data element must be saved just before the item is added to the rundown. If you have reopened the data element, or you it drag directly from the list of data elements, the timing information will not be available.
-
Keyboard Shortcuts for Template Editor
|
Keys |
Description |
|
CTRL+ALT+C |
Copy a data element from the data element list, or an open element in edit mode. |
|
CTRL+ALT+S |
Saves the data element as a new data element. See also CTRL+S. |
|
CTRL+C |
Copies a data element from the data element list. See also CTRL+ALT+C. |
|
CTRL+D |
In data element view you can sort according to a data element’s creation date. |
|
CTRL+N |
In Template Search you can sort according to template name.In data element view you can sort according to data element name. |
|
CTRL+SHIFT+D |
Toggles the Calendar button, exposing the start and end date fields. |
|
CTRL+SHIFT+I |
In template view you can open a template by ID. |
|
CTRL+SHIFT+L |
Switches to the template editor view, and back to the Template Search and data element view. |
|
CTRL+SHIFT+N |
Toggles the Finish button, so that the data elements view will only show data elements that are not marked as finished when saved. |
|
CTRL+SHIFT+O |
Opens a template by name when in Template Search. |
|
CTRL+SHIFT+P |
Toggles the preview. See also Maps and Remote Preview in the Newsroom. |
|
CTRL+SHIFT+R |
Refreshes the template and data element panes, and reloads all templates/data elements available on the database. |
|
CTRL+SHIFT+S CTRL+S |
Saves the data elements. See also CTRL+ALT+S. |
|
CTRL+SHIFT+1 |
Toggles the image search filter. |
|
CTRL+SHIFT+2 |
Toggles the audio search filter. |
|
CTRL+SHIFT+3 |
Toggles the video search filter. |
|
CTRL+SHIFT+4 |
Toggles the filter. |
Working with the Template Editor
This section contains the following topics:
-
To create a data element
-
To rename a data element
-
To edit a data element
-
To add an open data element to the newsroom story
-
To copy an open data element
-
To copy a data element from the data element list
-
To change a concept and/or variant
-
To preview a video in a template
-
To get the data element’s default channel
To create a data element
-
Double-click a template from the Template pane to open it in the editor.
-
Make the necessary changes to the data (e.g. text, images, video clips).
-
Click the Save button.
-
In the Saving an Element, enter a name for the data element.
-
Click OK.
To rename a data element
-
Double-click to open a data element in the editor, and click the Save As button.
-
In the Saving an Element, enter a name for the data element.
-
Click Overwrite Existing.
To edit a data element
-
Search for and select a data element and double-click it to open it in the editor.
-
Make the necessary changes to the data (e.g. text, images, video clips).
-
Click the Save button.
-
Click OK.
To add an open data element to the newsroom story
You have three options for adding a data element to a newsroom story:
-
Drag and drop the orange icon (top-left) onto your newsroom story

-
Press CTRL+ALT+C to copy it to your clipboard and paste it into your newsroom story
-
Open an already saved data element and drag and drop the green icon onto your newsroom story

To copy an open data element
-
Open a data element and press CTRL+ALT+C to copy it to your clipboard and paste it into your newsroom story
To copy a data element from the data element list
-
Select a data element from the list and press CTRL+ALT+C (or CTRL+C) to copy it to your clipboard and paste it into your newsroom story
To change a concept and/or variant
-
In the editor, simply use the Concept or Variantdrop-list to select a new concept and/or variant.
-
Click Save to save the data element.
Note: Concepts and variants are created using Template Wizard’s template manager tool.
To preview a video in a template
Once a video item has been added to the video placeholder:
-
Right-click the video placeholder and select Preview from the context menu
-
The video and any graphics elements that have been added are previewed in the Timeline Editor Preview window.
To get the data element’s default channel
A default channel can be set for a template, which can be passed to the newsroom system when items are added to the rundown.
-
Ensure that a default channel has been defined for the template (see To set the default channel for a template).
-
In Pilot Data Server’s VCP Parameters, set the parameter ax_add_itemchannel to enabled.
-
Create a data element from the template and drag it to the rundown.
To turn off this feature, disable the parameter ax_add_itemchannel.
Media Search
This section contains the following topics:
-
Search and Result Panes
-
Media Context Menu
-
Details View
-
Search and Filter Options
-
Filter Media by Person Name
-
Media Search Errors
Search and Result Panes

The Media tab allows users to search for media assets (i.e. still images and video clips) that can be added directly to the story (e.g. a full screen video clip).
Media information resides on storage systems such as Object Store and Viz One. Object Store traditionally stores still images and person information. Viz One stores video, audio and video stills. The Media tab combines the sources into one.
The left pane shows the Search and Filter Options and a list of categories, while the right pane displays the search results, and optionally, the item details.
In order to reduce network load and to increase the speed of the search, the media search will display the first 15 results from each provider (e.g. Object Store or Viz One) and then ask for more if needed when scrolling. The most recent assets are displayed first. If the number of results is large, it is recommended to refine the search.
If multiple Viz One systems are in use, all of them will be searched and the search results will be combined according to the ID of the clip. i.e. If the same clip is available on multiple Viz One systems, it will only appear once in the search results.
Note: Depending on the data available from each provider, the status bar will display either ProviderName=N of M shown or ProviderName=N found, where N will increase as more items are fetched. If a provider does not provide sufficient information, the status bar will display ProviderName=unknown.
Media Context Menu
-
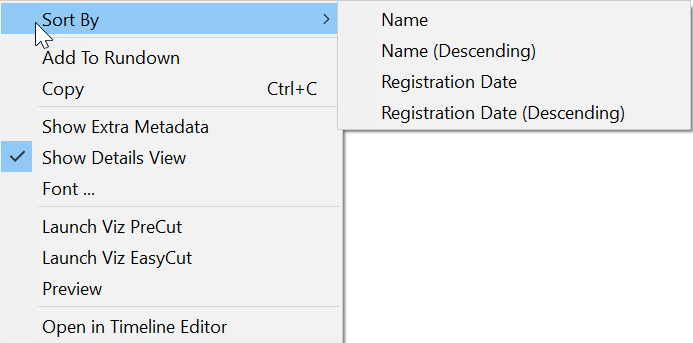
Sort By: Displays a sub menu with sort options.
-
Name/Name (Descending): Sorts by name in ascending and descending order.
-
Registration Date / Registration Date (Descending): Sorts by registration date in ascending and descending order.
-
-
Add to Rundown: Enables newsroom systems, that do not support drag and drop operations, to add media elements to their rundowns. In order to use this menu option, the database setting ax_enableMediaSendToRundown (see Viz Pilot Database Parameters), must be added to the database and enabled.
-
Copy (Crtl+C): Copy the selected item. It can then be pasted to the rundown.
-
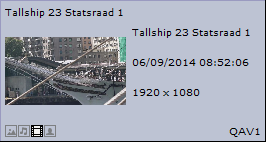
Show Extra Metadata: Switches the media icons to display metadata such as complete filename, creation date, and clip length and so on.
-
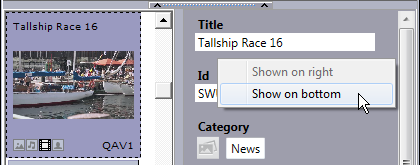
Show Details View: Displays metadata of the selected media item in a separate window. Right-click to view the pane at the bottom or on the side of the Media pane.
-
Font: Sets the font’s type and size.
Note: Style and script options will not be saved.
-
Launch Viz PreCut: Opens the selected video clip in Viz PreCut for editing.
-
Launch Viz EasyCut: Opens the selected video clip in Viz EasyCut for editing.
-
Preview: Previews images using the Windows Picture and Fax Viewer or the default browser. Is only available for Object Store and Viz One items.
-
Open in Timeline Editor: Opens the Timeline Editor that enables you to add graphics placeholders to a video clip’s timeline.
Details View
Display an item’s metadata by selecting Show Details View from the context menu in the search results.
The Details View shows the metadata that is received from the asset search provider. The type of data available can vary, and can be configured in each asset search provider.
The Details View can be placed at the bottom of the search pane, or to the right. Use the context menu in the Details View to change the location.
Search and Filter Options
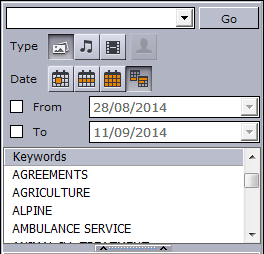
Both Object Store and Viz One searches support free text, keywords, and from- and to dates. Combine the use of filters, text search, and keywords to narrow down your results.
-
Search field: Combo box for entering a search criteria. Previously entered search criteria are remembered per session.
-
Type - Stills, Audio, and Video: Filters the search result displaying only images, audio or video, according to which filters are enabled/disabled.
Use CTRL+click to select multiple types.Note: Viz Pilot News does not support the use of audio files.
-
Type - Person: Filters the search result displaying only pictures that are defined as person (i.e. profile) images in Object Store. See also Filter Media by Person Name.
Note: The Person Filter button is only available if a RestVOS Search Providers is configured. If using standard Object Store, search for person name by typing in the Search field.
-
Date: Filter results based on date range. Select from Last 24 hours, Last week, Last month, Custom date range. Filters the search result based on registration dates.
For Viz One searches, the default date used to search is the CreationDate (date the item was created in the Viz One), however this can be configured to use other dates from the metadata, for example PublicationDate. For more information on how to configure the search, see the Viz One Administrator Guide. -
From/To: When the Custom date range button is selected, the From and To dates are presented.
IA red background indicates that the from-date specified is later than the to-date. -
Keywords: Filters the search result based on keywords. Templates that use the RequiredKeyWords property will have the relevant keywords pre-selected in the list. Keywords are configured for each Service Provider. See Required Keywords. A warning is displayed if the image selected isn’t valid.
If multiple Viz One systems are in use, all of them will be searched and the search results will be combined according to the ID of the clip. i.e. If the same clip is available on multiple Viz One systems, it will only appear once in the search results.
Filter Media by Person Name
-
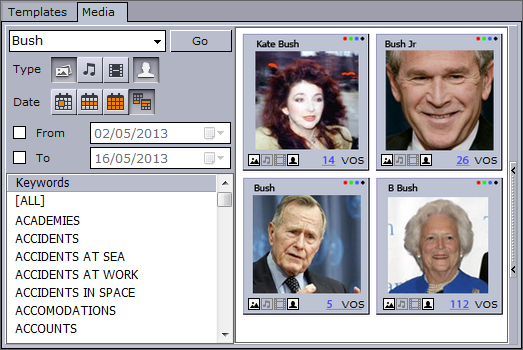
Click the Person Search icon.
-
Enter part or all of the person’s name in the Search field.
-
Click Go.
-
The search results are grouped by person. The number of items found for each person is shown below the thumbnail.
-
-
Click the thumbnail of the desired person to view all of the images of that person.
-
Click Back to select a different person or to search again.
Note: This Person Filter function is only available if RestVOS Search Providers are configured. If using standard Object Store, search for person name by typing in the Search field.
Media Search Errors
-
Startup Error: An error occurred during startup. The host (or Viz Pilot News) will need to be started again to clear the error.
-
Search Error: An error occurred during a search. Try doing the search again.


